


After designing and building so many large commercial hydroponic systems throughout the world, it's often a nice change of pace to create small hobby systems for home use. They're fun to make and even more fun to use and observe. And of course, when filled with a variety of plants, a home hydroponic garden can spruce up any patio, solarium or living room. By far the best aspect of a home system in my opinion is convenience. Even in the dead of winter you can have fresh flowers all the time if you wish and no more running out to the store because you forgot a green pepper, one of the most important ingredients in that recipe you wanted to try tonight.
Over the years I have made a number of home hydroponic systems from materials I could find nearby, whether they be PVC tubes from the hardware store or plastic bags from the supermarket. My whole philosophy of hydroponics is to keep it simple, and this is even more important for home units. Nobody wants to come home from a long day at work to battle with their garden.
The Basics
 If you understand how hydroponic systems work--which is not difficult--you should have no problem building and maintaining the home unit I describe below. Most hydroponic systems employ some type of media, like rockwool, expanded clay pellets or perlite, to support plants and hold nutrient solution in their root zone between watering cycles. In medialess systems (often referred to as "water culture"), a continuous supply of nutrients is provided to plant roots either in a fine mist (aeroponics) or flow, in which the root tips hang (Nutrient Film or Flow Technique). A combination system, called aerohydroponics, employs both the flow of nutrient and the fine mist for the best of both worlds. Another water culture system is the float system, which many of you have probably read about in other articles I've written for The Growing EDGE. This type of system works by placing plants in a foam board so their roots hang through it, and floating the board so their roots hang through it, and floating the board on the surface of the nutrient solution in a tray or pan. There's no doubt that all of these systems work very well, but they do have some drawbacks for home applications.
For example, medialess systems that rely on the continuous flow or misting of nutrient solution--like aeroponics, NFT and aero-hydroponics--are more at risk from power outages and mechanical failures. Because they have no media to hold solution in the root zone, if a blackout occurs, roots are subject to drying out, which can happen very quickly and destroy your entire crop. The float system is not very practical for home use as it limits your growing choices to short term crops like lettuce since the roots are submerged in the nutrient at all times. The roots of longer term crops would start to break down in these conditions after a while. Also, the nutrient solution is very accessible to pets and children, which could be harmful to them.
Top-Feed Tray System
The system I prefer, and have on my own patio, is a recirculating tray unit filled with perlite. In this top-feed drip system, a two-inch layer of perlite serves as the growing media and nutrient is dripped in at one end and gravity-fed to a drain at the other end, which directs it back to the tank for recirculation The system requires very little attention and if the power goes off, a dripper clogs or a pump failure occurs, you have 12 to 18 hours to correct the situation. And because it works with a medium, the nutrient is buffered, which helps minimize errors in mixing calculations if you accidentally knock the pH off balance a little.
I first set this system up for a neighbor of mine who owns a local French restaurant. When my son saw the unit producing beautiful, thriving herbs in her house, he insisted we have one of our own, so within a week, we built a double unit and planted it with herbs, tomatoes, lettuce, peppers, flowers and any other seeds my son could get his hands on. That was three years ago. Today the system is still on our patio putting forth an abundance of fresh food and flowers.
Parts and Assembly
The parts for my home unit were all bought locally and are easy to replace if necessary. The two roof pans used for the growing beds are 12 inches wide, two inches deep and 6 feet long. Often used for construction projects, roof pans like these are available in most hardware stores. They are aluminum with an enamel coating, which is excellent because they are so durable. However, if you cannot find pans like these, it's very easy to build similar beds from wood. All you have to do to prepare them for hydroponics is line them with double layer, six-millimeter polyethelene to make them waterproof.
 For actual growing system, you'll also need a small Maxi-Jet aquarium pump and either a recycling container with a lid or a 10-gallon Rubbermaid® storage bin for the nutrient tank. We'll get to the irrigation supplies a little later.
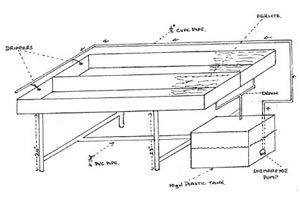
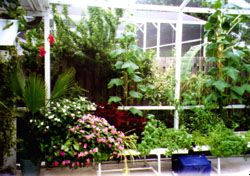
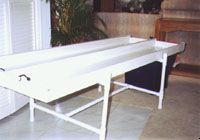
To make the stand, you can use regular Schedule 40 three-quarter-inch PVC pipe, and fittings to connect the pipes together. It is essential for you to create a one-inch slope from one end of the stand to the other for nutrient drainage to occur. The diagram below shows the construction of the stand and its slope for a single bed. You'll want to build your stand according to how big your growing area is. My home system, as you can see in the photos, is a double-long bed. To start off, you may want to just make a system with only one growing bed (roof pan).

Once the stand is ready, the trays just get pop-riveted to it, using a silicone sealant to caulk around the rivets. Then you drill two half-inch holes in the lower end of each sloped tray and screw a male half-inch PVC adapter into each; don't forget to caulk around them with silicone to protect against leaks. Connect equal lengths of half-inch PVC pipe to each adapter, using elbows and a T-fitting to create a cross-bar between the two that will join them into a single drain line to the nutrient tank, which should be situated directly beneath the drainage holes. Refer to the diagram below for a better idea of how this should look. In the systems I built, I fitted each of the drain holes in the end of the growing beds with a three-inch tube of window screening to prevent perlite from entering the nutrient tank.
Now for the most important part, the nutrient delivery system. You'll notice that the photo of my home unit differs a little from the diagram. I used PVC piping for my irrigation line and it doesn't go all the way around the growing beds. You can do that, or you can follow the diagram, using either half-inch PVC pipe or standard half-inch irrigation line, which can be bought at any do-it-yourself home store or K-Mart®.
To follow the diagram, lead half-inch irrigation tubing from the pump in the nutrient tank up and around the growing beds to the high end of the tray. Obviously the tubing won't just stay like this and it will bend as you curve it around the beds, so you'll need to cut it into sections, connecting them with elbow-fittings around each corner. In total you'll have to cut the line into five different sections, connecting them with four elbows. You'll need a yard stick or measuring tape to determine where you'll need to make your cuts and connections. Precise measurements are dependent on the height of your stand and square footage of your growing bed. The end of the irrigation line will need to be closed off as well. If you use PVC pipe, end pieces can be bought to close off the tubes. With irrigation line, you can use a figure eight end adapter to do this. All it is a piece of plastic shaped like a figure-eight; you stick the end of the tubing into one of the loops in the figure eight, bend it and stick it through the other loop. The bend closes off the line. One point that should be made: if you use irrigation line, it probably won't stay stiff above or along the outside of the growing bed as pictured in the diagram, so you may have to afix it somehow to the edges of the tray or just lay it along the surface of the perlite around the edge of the bed.
Finally, at the opposite end of the bed from the nutrient tank, drill a couple of holes into the irrigation line with an 1/8-inch drill bit or irrigation line key punch. Once you pop the drippers or spaghetti tubing into those holes, your feed lines are ready.
Almost Done
At this stage, you're ready to test the unit. Prepare the perlite by flushing all the dust out. Don't forget to wear a mask when you do this; the dust is bad for your lungs. When it's ready, pour it into the system, smoothing it out about a half-inch from the tip of the tray. Fill your nutrient tank with water and plug in the pump. If there is too much pressure from the pump, make a small hole in the pipe near the pump. When everything is running okay, add nutrient and plant!
Testing the EC and pH of your nutrient solution should be done daily.
The thing I like most about this unit is that it gives me a 12-square-foot growing area that can easily be doubled without even switching to a larger nutrient tank. With 24 square feet of growing area, you should have enough produce to feed a family of four. Another great feature is that it is very easy to maintain, and if you go away on vacation, you can simply add a small float valve and line to a water hose to keep the tank filled. I have left our unit for over three weeks with this method, and other than our herbs being overgrown and little yellowish, everything survived, and within a few days of my return all was back to normal.
Have fun with your new hydroponic unit, and remember to spread the word that hydroponics works and grows!
Gordon Creaser is a regular columnist for The Growing EDGE and professional hydroponics consultant.